Wednesday, July 6, 2016

Do You Have Breasts? ~ Finding a fit for those who's chest falls outside measurement norms

Of course if you have two X chromosomes you do! Those with a Y chromosome and some breast is a whole different topic so we will just chat about us wonderful "Double X" gals. Sorry fellas.

One of the things us "double X" gals have been blessed with are breasts. Wonderfully soft tissue that makes all of our shapes and sizing diversely unique. Seriously, have you ever wondered how clothing designers try to get all of that into a range of about 12 sizing options? It is bad enough that our "Y" counterparts have different builds...thin, wiry, average, husky...but there are no other "protrusions" that further complicate things. Us in the "Double X" club have all those different builds but then add melon like globes to the tiny thin build or golf ball sized to a plus sized build and you can easily see how things get very complicated and you can end up with ill fitting "tents" rather than a lovely garment that makes you feel wonderful and proudly display your womanly curves.

Perhaps you are like me. A "plus sized" gal with the added bonus of melon-like breasts. If I go by measurements alone there are really no patterns out there in our indie pattern world that I should be sewing. Certainly none that do not offer a personalized tent to my wardrobe. This happens even in ready to wear items. I get something large enough for my chest and then feel frumpy at best.

Pattern designing is a complex process and in reality can not cover every single body type. I do not expect that of our designers. Did you know that patterns are developed and graded for an average "B" cup? Now by today's standard, that is a cup on the smaller side. With (it seems) more and more women in our sewing communities more in the range of multiple D, E, F, G and beyond cups this has become a "real" issue to more than a few. Many of us have breast measurements that fall outside the sizing charts of the patterns and feel we are "out of the game". However, I have learned that is not necessarily the case!  I can use several patterns my bust is too large for (by chart), adapt and feel fabulous! I want to share that with all of you today and open up a  new world of patterns that will work for you and fit as well! Please grab a cup of tea or your favorite glass of wine and hang out for a few minutes with me as I explain.

I often work with the fabulous Katie Wilson of  Duck Butt Designs in testing kids patterns for my little gang of goblins. This time she did a call out for testers of the new women's BLAST top and I noted that I was right close to the top range of chest measurements (you know, depending on what bra I wore). I decided to give this one a whirl as I was in desperate need of some new clothes and I really gravitate to necklines that are not the typical crew/rounded neck to help take away focus on breast size.


I will be honest. My first attempt was a "bust". See what I did there :)

As you can see, by going by my bust measurement size only, I ended up with a very sloppy neckline and excess in other areas as well. It was not a garment that I was going to feel fabulous in and it was in no way Katie's fault. The pattern was well graded but my body defied the "standard". I admit, I felt a bit defeated.


In our testing group the ladies began chatting up FBA. A few of our "smaller" girls were doing them. I admit, having not sewn many tops (other than the intentional tent looking type) I had not delved much into the world of FBA. It was time. I had to make this work. I could not fail. Not even so much for myself, but for my wonderful friend who had shared so many opportunities with me. It was time to step outside of my comfort zone and slay this breast...err beast.

So what is FBA?..."Full Bust Adjustment". It is a pattern alteration that allows you to use a smaller size for better fit in shoulder and neck areas while allowing room needed for your breasts. There are some techniques that you may already be familiar with...for example a dart. A simple way to add a little bit more fabric at the breast apex. Sometimes a dart is not desirable, or does not give you enough additional room.  Let's talk about how we can make this work.

My first, and perhaps most important suggestion is to PLEASE take a bit of time out and go get yourself properly fitted for a bra at a specialty shop where it is all that they do. It honestly makes a word of difference and is a necessity. I did a blog post a couple of years ago that talks about a fitting experience. Now reviewing it, I am reminded it is time to go again as I gained some of those lost pounds back. Please have a read.
Image from AAH Intimates Blog

This Bare Necessities page has a great overview as well as has a video on measurements and cup sizing. I want to really stress that an "in person" fitting is important and allows you to try on a range of brands and sizing options. Perhaps viewing this will show you that you NEED a fitting. Pro Tip: Get the "professional fitting" and find out the style, brand and size that fits you and makes you feel fabulous, then get your additional bras at an online retailer to save dollars. I typically buy one at the store who has helped me, then search out online options for the balance of my wardrobe.

To get great fit we need some measurements relating to our bust area.

Over Bust: above the bulk of your breasts with tape snug up in your armpit and level.

Bust: The fullest part of your bust with tape measure level.

Image courtesy of Katie Wilson Duck Butt Designs
Under Bust: Rib cage under breasts with tape measure level

Breast Apex: From top of shoulder down to the apex (nipple) of your breast

Across Shoulder: From the top of the ball (point) of your shoulder to the mid point of your neck

Apex Distance...the measurement from nipple to nipple.

If you have a difference of more than a few inches between your over bust and bust or a size difference indicating larger than a C cup, I suggest you consider a FBA.

Now lets determine the size you should sew. On the size chart plot your bust, across shoulder and waist. If there is a size difference between your bust and shoulder measurement sizes,  plot your over bust in the the bust column. This should be closer to your shoulder measurement and more proportionate and helps to separate actual body size from bust. The neckline of this pattern makes the shoulder measurement of particular importance.
Sizing Chart sample from Duck Butt Designs

In my personal example my measures were:  

Full Bust 56
Over Bust  45.5

Waist 46
shoulder 9 1/4
Chest 8


We ended up choosing to do a size 20 (closest to the shoulder measurement) with FBA. My difference is 8 inches between my actual bust and the bust measure for the size selected.


Now that we have a size to work with, lets begin the magic! Print off the pattern in the required size and ensure your scale square is correct. Gather some extra paper, a ruler, marker and paper scissors. I am a tracer, so you are going to see my traced piece in the following photos. While this pattern is equipped with layers, I typically print all sizes and trace. It is just a preference thing. Pro tip: If you alter or trace patterns often, purchase medical exam paper by the roll. It is economical and fits the job needed perfectly!  
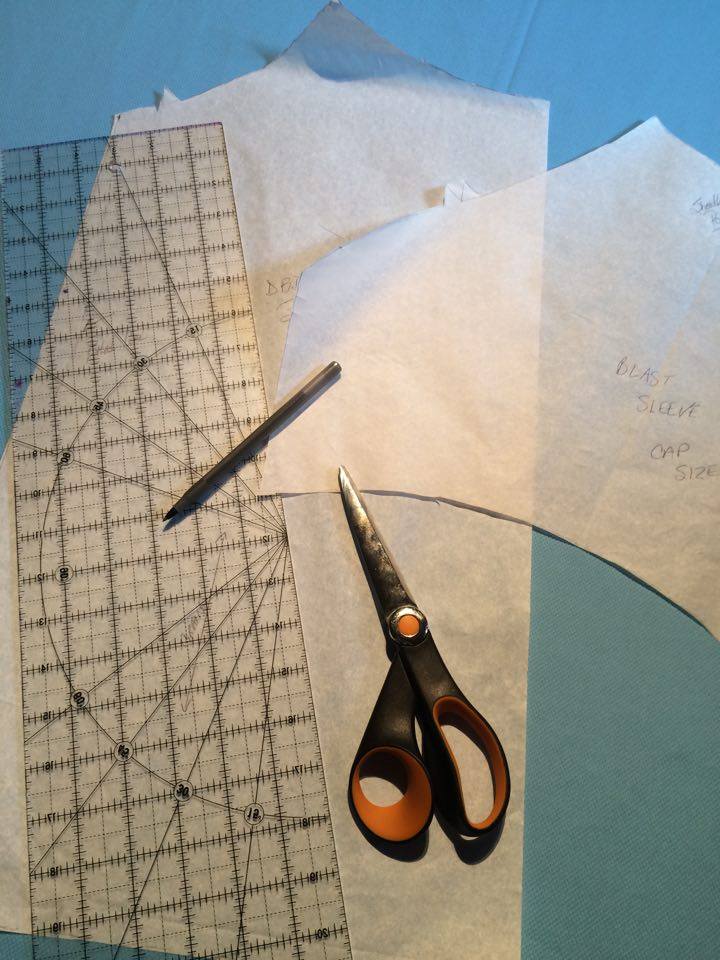


Take your Breast Apex measurement and transfer it to the pattern. On this pattern this is a bit tricky as the front does not go all the way up to the shoulder. As a result, you are going to find the mid point of your sleeve (the top of shoulder)  by folding it. Mark that point. Place the sleeve beside your bodice front piece with seams aligned. From the mid point you marked, measure down the pattern the length of your Breast Apex Measurement. This gives you the height of the apex. Now take your Apex Distance Measurement and halve it and use that to measure in from the center front. This cross section of points should give you where a reasonable estimation of where your nipple sits relative to your pattern piece.

Sleeve on left meeting up with top of front piece, measuring down to mark apex.
Measuring in from front center for second apex measurement.  Plot the dot on the line that was determined form measuring the shoulder down.
Apex determined.

From this dot, draw a line straight down to the hem and one straight across to the side seam.


Now from the dot draw a line to approximately 1/3 up from the base of the armscye (bottom of armpit). Just above the notch is a good point on this pattern to reference.


It is now time to do some "slashing" of the pattern. As you cut from the hem upwards be sure to NOT cut all the way through the armscye. Then from the side seam be sure that you do not cut all the way through to the apex. This will allow for some key areas to remain constant.

Here we show how a small amount is left attached at the apex from the side seam.


This is where there is a bit of "wing and a prayer" stuff that goes on. If we were using woven fabric then the "rules" are fairly straight forward. Make your FBA at a rate of 50% per side or 100% total of the difference of measures....your full bust and the bust of the pattern size. You then get the full amount needed across both sides of the front with this "stable" fabric.

We however are making a FBA with knit fabric that has a fair amount of "give and forgiveness". We actually WANT the fabric to cling in all the right places and if we did the FBA at 100% you would end up with excess droop and sagging...which is EXACTLY what we are trying to get away from! What we want is some "negative ease". I personally started at about 60% (5 of 8 inches total) and was using 95/5 cotton lycra. If you were using a more stable knit like 100% cotton interlock you would want less negative ease for a good fit (perhaps 7 inches of 8 total) . Pro tip: With all of this in mind, please DO NOT use your favorite custom knit that you paid $50/yd aftermarket for because you.had.to.have.it. Use a less expensive cut (solids perhaps) with the same fiber content and stretch as a "muslin" or "tester" to ensure a good fit first.

So let's tackle an example in photos. You have a difference of 4 inches between your  bust and the bust measurement of the pattern. First lets go with a negative ease of about 2 inches . This brings us to needing 2 inches in the bust. Half of that is an inch on each side. This is the amount we want to make the pattern bigger.


Rotate your pattern piece to create a 1 inch gap. Note that the armscye stays constant as it is still joined. This is the reason we did not cut through fully.


This is what our pattern piece now looks like. There should be sufficient room to accommodate the breasts while having a well fitting neck line and shoulder area.


Fix the lower hem line by blending the bottom piece. You do not want to cut off the bottom as you would loose the extra you just added. You then proceed to cut pattern pieces as instructed in the instructions. When you sew, ease the additional gap at the side seam like you would a sleeve.


If you have a more ample breast area (more than 4 or 5 inches) between the bust and pattern bust measurement, we need to utilize a slightly different technique to create enough room in the FBA.  As you can see if we were to do just the method we just did, the sleeve attachment gets pretty crazy and the curve is completely lost.

In this case all the measurements and marking transfers are the same as the above example. This time however, we do cut right through from the side to apex. We leave the armscye intact as above though.


To create the excess room needed in the bust that can not be created in slash and swing that works from the armscye , we use the side seam split and drop. By dropping down that portion of the pattern more room is added at the side of the breast. Join the side seams with a slightly rounded line which again gives just a little bit more room. How much you drop, depends on the need. This example is based on my personal measurements.  I had a total of a 8 inch difference between my over and full bust. Add in a negative ease estimate of 3 inches, I need a total of 5, then halved for each side of the front, so 2.5 inches. As you can see I gained 1.5 inches in the slash and rotate portion and an additional 1 inch in the side split and drop. Additionally I did a "rounded join" at the side seam to gain just a little bit more room. Since I downsized to a size 20 and my waist was at a 24, this also creates the additional room there as well without the need for grading further.


I like to split the difference this way as it lessens the curve change in the armscye. I found that by doing less "swing" and more "drop" a nicer line was created at the sleeve. Once again I blended the hem lines and ended up with this as a final pattern piece. One other note, my pattern was cut on the "full cut" line. I did add the "slim fit" line and at this time you could cut to it. I would do the FBA development with the full cut line however and trim after the fact.

Construction takes an extra step to use this method. You now have a longer front side seam than back. This needs to be reduced by one of two methods.  Mark the top and bottom of your "side seam drop" on your fabric.The first is to ease it in. For shorter distances this is the cleanest way to do the side seam. If you have a larger amount that is not going to ease without a "gathered effect" or overly stretching the back, utilize a reverse box pleat.


Finish the rest of your garment per the instructions.

As you can see, the fit in the shoulder area is MUCH better and the neckline sits nicely and has proper coverage by using a smaller size overall with a FBA. While this example was created for, and specific to Duck Butt Designs BLAST Shirt it can be used on any of Katie's women's knit fabric patterns. The key difference would be that we utilized the sleeve in determining apex because the pattern front did not extend up to the shoulder. It would also be able to be applied to many other designers patterns as well.


I hope that this opens up a whole new world of patterns for ladies who are on the "larger" side of sizing and whose bust fall outside of the measurement charts. Taking an upper bust measure into consideration to more accurately determine BODY size and utilizing a FBA for BREAST size, it is my hope that you can realize that there ARE several patterns out there that WILL fit you.

For those of you who feel a bit of "frump" by choosing a larger size and ending up with excess fabric in all the wrong places, I hope you can find your "I feel sexy" fit with this knowledge.

Many thanks to Katie Wilson. Testing with her is a joy. She leads a very collaborative and supportive group through a testing process and the team effort of turning out a final pattern is very rewarding. Please know, this designer goes ALL THE WAY!

Shirt Pattern:  BLAST Top by Duck Butt Designs                                             
Skirt Pattern : Sassy Pocket Skirt by Duck Butt Designs
Fabric: Stache Basics Collection by Fabric Stache (Shannon)
Sewing and Model: Michelle Racher


Pin It!

Monday, December 7, 2015

Welcome!

I know we have folks stopping over from Tree Hugger Cloth Pads and wanted to welcome you all!!

I hope that you all enjoy your Spa Turban Headbands that were a free gift with purchase from the Black Friday Event Crystal and Scott held. I have "known" them for almost 8 years now and have truly loved watching their business grow and evolve as each of you have become their customer!

Nechako Notionary is my "landing spot". It is where all my "true loves" merge that help me define myself as a woman and more so a relevant human being. I think it is something that is important to EVERY individual.

So what does that mean? Honestly, it may depend on the day. Some days it may be sharing a creation that I made for my children. Others a canning adventure, or gardening. At times it is connecting with my artsy side. Most recently it was providing this gift for each of you to receive from Scott and Crystal and coming soon is working with a group of 80 kids in their school play. I have a large studio space and a fabric stash that is pretty EPIC (if I do say so myself) and working with fabric is likely my "first love".

As a woman who has a serious chronic health issue, I find that I feel I sometimes lack "relevance" and "value", atleast in my own perspective. Sometimes my ideas are larger than my ability. Sometimes I wish I am things that I simply can not be.

I WANT Nechako Notionary to be "something". Currently I am exploring that journey again after realizing that I can not do what I was doing. Right now, I am just wrapping up a year of "strengthening" and "self care" after a particularly difficult time healthwise.

I do hope that you will follow the blog (I promise you will never be bombarded, I am lucky to get a post in every couple of months) or even better follow Nechako Notionary on Facebook. I am most active on Facebook and have a few fun things planned for this year.

Nechako Notionary.... In the Studio, In the Kitchen, In the Great Outdoors. You will finds little bits of everything...but mostly, as women I hope we find little bits of ourselves that bring us inner joy.
Pin It!

Wednesday, August 26, 2015

Excitement!!!

So, not only is BACK to SCHOOL getting closer (13 days folks...that is LESS than two weeks!) but today there is progress happening down in the studio space.

For those who do not know, we have this amazing river beside us, the Nechako. It offeres up stunning views from my favorite lounger on the deck. As you can see the sunsets are simply STUNNING!!

There is however a much darker side to this beautiful river. One that does not always play well with others (us!). This river has now twice felt it was perfectly ok to invade my home. The first time in 2007 when I was pregnant with Mr B ( actually the day I went to rip out soggy carpets I bent over puked, stood up and told hubby I thought I was pregnant...I was!) and more recently this past spring.

We hoped that the flooding would not be as devastating this year and in some regards it was not. We likely went in with a different view having been through it ready. We went step by step. Empty the basement and crawl space floor. Pull carpets when that became necessary. The the drywall. It seemed criminal to be destroying our perfectly good home. There was JUST enough water to warrant these actions but not even enough to pump out...maybe a couple inches. Compared to last time where we had a couple feet of water this seemed most trivial...except it was not. Our biggest issue is that this does not happen one day and be gone and mopped up the next. Our floods last for weeks and months. We call the lower level the "Racher Shack Pool".

So, here we are late August. The concrete is all dried out and the little bits of mess that floated around are cleaned up. We are ready to rebuild!

I would love to add photos but my phone is playing with blogger well today. For now suffice it to say I am thrilled!! Work has begun. The new drywall will be here tomorrow morning. Hubby will hang it but I am the mudder and taper. 

I just HAD to share my excitement!!! 

It has begun!!

🔨
⚠️🚧⚠️


Pin It!

Tuesday, August 18, 2015

Back to School Prep

Ahh it is that time of year again. Some mothers are dreading it, others rejoicing.

For our family, it becomes a busy time but one full of hope. 

It was not all that many years ago that we were not even sure our daughter would participate in a mainstream school. She was very delayed, had several issues as a toddler. We did every support service out there. Today she is going into grade 5. Not only is she in a mainstream school and class, but she is near the top of her class and brings home awards in all disciplines...academics, arts and sports.

My youngest son was a real worry as well. When we first took him to school I had very real fears around if he would even stay on the grounds. He was very disconnected, had numerous "behaviours" that made him troublesome during his K and grade 1 years. That was, until with the support of our team we defined better the sources of his issues and treated him. Now, he is connected, can be told when his choices are going awry and he self adjusts most of the time.

So yes, we had much fear at the beginning of school years in the past. Now we are full of hope and looking forward to watching our kids reach their potentials.

This year, I am free to focus on the more "normal" back to school stuff rather than something more akin to a crisis management warfare plan. 

Things like... First day outfits. School supplies. Cleaning out closets and dressers to make way for new, bigger stuff.

So, it "seems/seams" to me this is a good time to get back to something for me. My blogging. I have " topics" and can talk about those things that all us  moms are going through this time of year...back to school prep.

Tomorrow is the dreaded "back to school shopping". The back to school part is certainly joyful now for me....it is the getting ready for it that may strike crippling fear in me. 

Come check in tomorrow to see if I survived....
Pin It!

Sunday, May 24, 2015

Taking Stock

It is difficult to believe when I came over here that it has been a year since I blogged. At the same time, it is not.

Life gets inherently chaotic sometimes. This seems to be such a season in mine. Last fall I became ill, as I do each year with my chronic illness. What was perhaps a bit different is that I was not able to "slog on", "fake it till I make it", or "put the brave front on". I was quite ill until recently and it took everything right out of me. My days and nights were spent sitting (and sleeping) in my chair, fighting to breathe and focusing on being just well enough to stay out of hospital. I am fortunate for my medical team who gives me what I need to do that most of the time. My doc especially knows how important it is to me and the functionality of my family for me to be home, even if it is simply just being able to sit in my chair and read a book with a child. It wears on me though, physically and emotionally.

More recently, I am facing a new diagnosis. I have skin cancer. So far it is "a good type" with little risk of metastasis. I had initial biopsies, then a week later at suture removal I was told my lesions were cancerous and less than 48 hours later had surgery (and a whole new set of sutures) to remove the cancer from one site. I got those sutures out a few days ago. I have another site that I will have surgery on and am scheduled for an appointment to review more areas which will certainly have more biopsies and possibly have more cancerous lesions removed. This just may be the summer of surgery and sutures it is looking like. While each incision is just a couple of inches long, they do still hurt and limit activity.

So as you can see, my sewing time has been limited. In fact, save for a pair of jammies for each of my kids and a couple of 15 minute dresses, I have not sewn since OCTOBER. Yes, you read that right. October, right around Halloween. This is the end of May.  Seven whole months.

Sewing was my muse. My purpose. My feeling of value and worthiness. My escape. It was my contribution to my family. I saw fabric and cutting and putting it together as art. I would sew as it made me feel better....until it did not.

So now what is a girl to do?

I look around and still see the effects on my home and family of a marginally functioning matriarch. My home is not the standard I would like. I would like to be able to do more with the kids. Gardening season is upon us. Oh and a flood. Let's not forget that we are actively under a flood watch for the entire summer this year and must prepare our home for a couple of feet of water in it (again).


I remain overwhelmed. I do not want to be. I want to find pleasure and self satisfaction once again. I want to feed my soul and flourish and bloom again, just like the flowers in the garden. These things make me smile. Give me strength. Make me worthy.

I want to garden. I want to find my paintbrushes and see if I can still create art. I want to wrangle my home, and my kids. I want to support my little man who is struggling with new a diagnosis and help him be successful at school. I want to teach my girlie to appreciate the things around her and share skills that one day may also bring her pleasure. I want to be a better wife. One who supports her man and is a good partner for what he wants and needs. I would love to read a book.

How is it that we can somehow become so busy getting next to nothing accomplished and have no time for these things that soothe a soul? I know that today I want to take some of that back. I want to record this journey. Record it so that I can reflect on what is taking place in those moments that feel like nothing is. To remind myself of my goals. And perhaps even to record some of the barriers if "life" gets in the way of achieving them so that I can reconcile it rather than beat myself up over it. I need to remind myself that if I have just had a procedure and have a bunch of stitches and it hurts to move that it is ok that the garden is not yet planted. At the same time, I need those goals to focus upon so that if all is going well I can knock them out efficiently.

Today I sew. My daughter has been asking so I will sew for her. I have printed off the pattern I will be using and need to tidy up the studio to be able to work, but it is my goal that for tomorrow, Monday, she will have something new to wear to school. I am going to find my sense of worthiness, my value, my purpose, my muse and escape sewing today.
Pin It!

Sunday, March 23, 2014

Sewing for a stranger that is YOU... let's talk FOUNDATIONS Part1


Foundations...yes as in under garments.

In a building the foundation is that starting point for the entire construction process. It is the heart of a building, provides for it's strength and stability as well as the basis for its style. It is not so much different in fashion either.

Bras and panties can make or break a garment. It is that simple. Want to look great? Get great foundation garments. I am going to break this into two separate posts, top and bottom if you will.

So...before my weight loss I was wearing a 48H bra. Once upon a time, a long time ago I had *normal* breasts...a LONG time ago. It seems with each child I went up another cup size and STAYED there. It made no difference how long I nursed they just never.went.away. I thought I had gone down to a semi normal size. I definitely did not fill out my formerly nice t shirt bras and digging through the bra drawer I did find an old 44DD that I could stuff myself into for a minimized look. I was hopeful I was going to be able to walk into any department store and find bras again in the 20-40 dollar range. So hopeful.

I knew prior to making a new wardrobe I needed to be sized...properly. I needed a bra that put the girls up where they belong, didn't flatten me and would allow me to measure properly for pattern sizing. I made a plan with my hubby to get a kid free trip into the city so that I could concentrate on getting some under fashions. Let's face it, it is not the most enjoyable of tasks but it certainly need not be a bad experience either.

I began at my old "plus sized clothing" haunt. There the gal whipped out a tape measure and threw it around me right on the floor. Over my clothes and all. She exclaimed "Oh! I am not sure I can fit you." Really? I  used to buy my bras here... I KNOW my breasts are WAY smaller...I tried a couple on and knew I could get better service. I still had two different options planned and was not going to settle. Next morning I went to Sears. Yes, I had an overnight in a hotel alone!. Usually Sears has a nice older lady who fits bras...she was not to be found. I grabbed a 44DDD off the rack and was not happy with the fit. Seems "uderarm boobs" are going to be my nemesis..... <sigh>

I finally went looking for a specialty bra shop that I got my HUGE nursing bras from. Turns out they had closed down and that is why I spent 40 minutes driving around and posting on FB a plea to find it. I had one more option...the "other" specialty bra place. It was fancier and more expensive and had less selection for nursing bras way back when, but I headed there.

I am SO GLAD that I did!

I walked in and immediately asked "What size do you go up to?" The lady replied with "I have you covered dear, we go to a P." P?????? Holy moley...um, ok.


She took me to a large fitting room, asked if I had been fitted before (yes) and explained her usual procedure and to please not be uncomfortable. I told her my concerns, where I had been at bra size wise (48H), that I had recently lost 40 lbs and have lots of weird jiggly places and no longer fit my bras and what size old bra (44DD)I had stuffed myself into.

She measured and congratulated me on my weight loss and disclosed she had lost 65 lbs herself and that she "got it". I think a brick lifted off my shoulder right then. She explained that the jiggly underarm boob stuff will move forward into the breast tissue in time. Then she told me to be PROUD. I had gone from a 48 band to a 42! Yay! I thought! That is "normal"....aka that is easily found in retail outlets.


Then I saw it....starting me in the mirror....


....isn't it so true?

Next up she says remember the alphabet is just letters...it does not define you. She tells me she thinks my cup is a H. DEFEAT....I am no longer "normal" again...oh correction....retail, non specialty shopping is gone again. Selection is gone. Choices are gone. She must have seen my shoulders slump.


"Dear....you have gone down 4 band sizes...that is HUGE! You have done SO MUCH work. Every band size you go down, your cup increases one. So yes, your old cup was a H in a 48. That would make you a L in your current band size...you HAVE done well!" Hmmmmm.....I am not quite convinced. She promises me she will find a bra that will make me look and feel AMAZING. IN my head I run through the alphabet... L, M, N, O ,PPPPPPP.

We start trying on bras. She is right there with the next one hanging it in front of me and adjusting things in the back while I put the girls in the cups up front. Some fit ok, others we try a different size (cup smaller or band bigger) and then we finally start finding a couple of brands who's styling and cups fit ME...MY shape, MY size. They are comfortable. They look good. The underarm breasts are minimized or gone. The bra does not move all over the place when I raise my arms. The bottom of the breast does not poke out, the band is flush against my skin. The brands are Felina, and Elomi. They are both European, German and French I think. there is an exciting arrangement and array of styles, COLORS and prints!

The girls are up where they belong!!!  She narrowed it down to 6 or so. A nude, a couple blacks, a red satin number (shown here in blue), and a couple "animal print", one pink the other brown. She left me to ponder and retry any I wanted to make a decision. I looked and felt best in the brown animal print. While I had never had one, I KNEW it was going home with me. She assured me it would only show through under the tight white shirts it was a pretty chocolate color not a deep black. It had a beautiful smooth cup so I knew it was going to be good for t shirts.  Next I was thinking to get a light bra as well. White or nude. When it came down to it though, it was not my favorite, rather it was the least of the group so it went to the no go pile. Red satin with hearts or a black....I decided on one of the Felina blacks.

I knew these were pricey and as I am continuing on my weight loss did not want to get too many. She assured me I had room to go down in the bands and these should do for a bit. She made a customer card for me with exactly what worked for future reference, went over care instructions and congratulated me once again.

I left the store knowing I had had great customer service and had my girls well looked after now. My wallet was much lighter, but a good fitting bra is an INVESTMENT IN YOU.

YOU ARE WORTH IT!!

Now an assignment.

Every lady who reads this post. I want each of you to go to your yellow pages and find out your local specialty bra shop if you do not already know it. MAKE AN APPOINTMENT and get a FITTING.
I am not saying you need to spend a fortune there but you do need a proper fitting. EVERY woman does. Do that for YOU. These are where the best fitters are found. The ladies that KNOW their stuff and can best assist you hands down.  At least, be aware of what size you should be looking at and learn what makes for a well fitting bra and how it feels. We change as we age, after children and as we loose (or gain) weight. Have the knowledge so that even if you are able to buy off the shelf at a "big box" yourself, you know what is and is not working for you and look and feel great.

Now  for assignment 2. FYI, I am also doing this tomorrow when hubby is on afternoons and will update this post with photos. Go to your bra drawer and empty it on your bed.
  • Remove all the nursing bras if you are no longer nursing.
  • Remove all the bras that are missing one or both under-wires
  • Look at the backs...are they all stretched out and practically see through? Ditch it.
  • Try on the remaining bras...
    • got bubbles and bumps at the nipple...toss it
    • does it sit against your rib cage below the breast...yes, ok; no, put in the toss pile.
    • is it over 5 years old? you KNOW what you need to do.
    • is the top of the cup "empty" or does the cup cut into your tissue and give you extra breasts?...sing it...TOSS!
What are you left with? Anything?

Please do this for yourself. I now have 2 bras in my drawer. Yes, they are 42H. Yes, I had a mini crisis over that. YES!!! I feel and look great in them though! I also now know I can move forward in creating a wardrobe that will look equally fabulous now that the girls are "just right".

Next post will deal with the bottom half of the body. I promise it will not be as long either but will have equal importance!


Pin It!

Monday, March 17, 2014

A New Series Debut

Beginning next week, I am debuting a new series. The question is what to call it?

  • Sewing After Weightloss
  • Sewing for a Changing Body
  • Sewing for a body that used to have big b**bies but now has smaller ones
  • Sewing for this strange thing that houses my brain and vital functions.
  • Sewing for a stranger that is YOU...

Luckily, I began in the winter. I thought I could "hide" it and just wear my clothes until Spring. Well that worked.... kinda... you know, until I realized I could stick a roast on each butt cheek in my jeans; until my yoga pants fell down at yoga; until someone said I needed a new smaller winter jacket; and my shoes got all clicky sounding like flip flops because they are now too big. We will not speak of bra fitting...well not yet anyhow ;)

As self effacing as some may think this post is, it is actually full of pride. I had told few people I was beginning this journey because I was afraid of failure. My weight had been quite stable for many years and even  postpartum (times two) I bounced right back within a pound or two. It was not a healthy weight however. It was not a body I was proud of, not shameful of (most of the time), but not proud either. It was a body that even though my weight was the same, I was noticing as I age the tone was decreasing so I was actually looking larger...so NOT cool.

This school year my last baby began school. I swore that this was going to be the year I start looking after me and exploring the me I have become. This is just another part of that commitment to myself. To love myself. To put me first. Because, like so many other moms out there we give our kids the world and most of us and somehow in the fray of all that, can loose track of ourselves. I was one of THOSE moms and after having kids at home all day with me for 20 years, I had plenty of time to lose track of me.

Now that I have lost this weight, I do not have a clue as to what sizes I am. I want to make some clothes but I stopped myself. Why? Well because I need to begin at the foundation...yes ladies that would be BRAS and panties. Without good foundation garments you can not have nice fitting clothes. NO IDEA on my current bra size...none, nadda these days. So priority one is that I have booked a self care day with my hubby for Saturday. He gets the kids and I get to drive over 100 km to get a bra fitting and some new foundation garments. From there, I can get an accurate bust measurement and begin sewing tops and more.

So...I guess I did just debut this series didn't I?  I think I am going to call it....


Sewing for the stranger that is YOU.

Let's face it. Weight loss is a journey. Life is a journey. Motherhood is a journey. We are all bound by a personal journey of one form or another. Here I will share this portion of my journey. My triumphs and failures as I build a wardrobe for this body that is mine but that I am not familiar with.

Pin It!

Thursday, February 27, 2014

HUGE GIVEAWAY!!


Check out this HUGE giveaway valued at $1750 in prizes!!

Wander over to Fabric Stache Facebook group to enter 
https://www.facebook.com/groups/fabricstache/

Pin It!

Wednesday, December 11, 2013

Why do I "hoard" fabric?

I am seriously asking myself this question right now as I rearrange the studio.

I have moved fabric from one floor of the house to another. From one side of the studio to the other. From one shelf unit to another and so the list goes on. In the process I have come across fabric that I have had for several years but not touched.

This phenomenon is not limited to just one type of fabric...it covers the spectrum. Wovens. Knits. PUL. Cotton velour. Sherpa. Prints. Solids. <oiye!>

Tonight I began the process of my goal for 2014. Using up the fabric! I have cotton velour prints that I have no idea why I bought other than the sheer fact that they were cute. They were never earmarked for anything, did not fit any of my product lines at the time, so I clearly must have been adding to a hoarding problem LOL

So I cut into it....for MY kids...you know the cobblers kids that wear rags ;) Tomorrow is pajama day at school and I have always made my daughter new ones for the event and this year there are two of them at school so I whipped up two pairs of cozy jammies. Izzy got Pink Ooga Booga with hot pink trims and Ben got Sock Monkey with burgundy trims. 


They will both be well covered and surely warm. Maybe a little wrinkled too! As soon as I made them each one put them on "to try" and refused to take them off.

There I said it! I am sending my kidlets to school in slept in clothing. What do you think? Do they look like cherubs or little orphans?


PS

I must admit, there was not fighting getting ready for school. It went smooth as silk...or is that cotton velour? ;)

PPS...There is a giveaway going on. Sign up for our newsletter at newsletter@nechakonotionary.com and on Jan 1 2014 one of the subscribers will be drawn and get a mug rug sent to them.
Pin It!

Monday, December 9, 2013

Winding Down the Year

It is hard to believe that it is December already! Every year seems to go by quicker and quicker.

Here in Northern BC we are well into winter. While it has been quite pleasant in our terms, things are about to change and the snow is going to really add up in the next week. I am ready though. We have had snow since the beginning of November, but not much of it. Soon the kids will be able to cross the road and toboggan down their personal snow hill that the snow removal guys make. It gets HUGE!

Temps in the minus 30s mean the fireplaces are going and somehow a mood gets set as soon as they are. A feeling of warmth not just from the fire, but of comfort and well being as well. These are perfect days to have a pot of coffee going and a leisurely project on the go. Bliss is the fire going, the dog laying in front of it, kids sipping a cup of hot chocolate, the Christmas lights on and watching the snow fall and take on the colors of the lights in the dark as the ground sparkles with billions of diamonds shimmering. Yes, I do enjoy many aspects of winter and look forward to the coming weeks.


After a busy season I welcome a bit of a lull to focus on family. Still there is much sewing...just for the family! Pajama Day is later this week so the kids will be getting new jammies ASAP!. I found a darling pattern that I want to sew up and surprise Izzy with and also do one of the reversible hoodies from Fishsticks Designs for her as well. Ben needs some pants to go with his cool hoodie that I made during the testing phase of the pattern. The whole family should have new jammies for Xmas Eve as well.


This year is coming to a close. But so much newness is on the horizon. New hope, new goals, new directions.

I have been tearing the studio apart the past few days. Several things need different organization. I need to build something to house all of my thread and need to deep clean behind shelves etc and make some decisions about what I am going to use various fabric types for and figure out a new layout for them as well. Some I need to make a difficult decision about and get rid of. I am already planning some packages for Boxing Day! Really...who needs 5 TOTES of scraps?? Yes, there will be a Boxing Day sale.

I am setting up a newsletter list to communicate better with customers. Facebook is finally admitting that fewer and fewer are seeing posts and are stating it is only going to get worse. I want to build a reliable tool to communicate specials, giveaways, sales and happenings to my customers. This seems the best option given the current climate. You can sign up by sending an email to newsletter@nechakonotionary.com . Please put Nechako Notionary in the subject line. If you would also like to get info on BB Butts Diapers our parent label, please put "both" in the subject line. You will only get one email which will then include information on both labels. Newsletters will never be more than once a week, and only during certain events. More often, you will receive one email a month containing our newsletter.

This month is about soothing the soul, setting up for the next year and getting things in place to make new goals and strive to achieve those goals.

I thank you all for being along for the ride as we built over the past few months. I look forward to a year of real growth. I wish you all the best of the season and hope you all build one special memory with your family in the coming weeks.

From my family to yours....

Merry Christmas and Happy Holidays

Pin It!

Thursday, November 21, 2013

Craft Fair Season

My poor, poor blog. It is so neglected. By now I am sure you have all realized along with myself, that I am not the blogger extraordinaire! I am the first to admit, I get focused on one task and other things fall to the wayside.

So what is it that I have been focused on? Craft fair season!

Yes, it has arrived, and is nearly over almost at the same time. The most intense month or so of the year for a small crafty/manufacturing business.

We have one more event to attend, the WL McLeod Craft Fair on Nov 30. Doors open at 930 to the public. I really enjoy this event as it is at my children's school. It is "the event" in my town and it is so close to home! Hubby can easily give me a hand for a few minutes to do the heavy lifting of set up and tear down. Most of all, I  get to connect with people of our community.

Being a small manufacturer, I spend countless hours down in my studio at the machines and cutting tables rather than socializing and going for coffee. For the most part, I am ok with that. I am an introvert at heart I think, but then again after I have done an event, I find I have really enjoyed all the contact with the customers.

Good laughs, catching up on current events both personal and community, seeing the children that have been wearing our products over the past 5 years grow, getting to see customers for what seems like "the yearly visit" and seeing and hearing appreciation for the items that we make. At the end of the day, that is exactly why I do this.

Today I am finishing off custom items that were ordered at our last event last weekend for delivery tomorrow back in Prince George. Let me finish off this morning by showing you just a few of our items that are available currently and will be at WL Mc Leod on the 30th...


Pin It!

Saturday, October 5, 2013

Irons ~ A Sewing Geekery and Gagets Review


An iron is a pretty integral part of any sewing studio and most projects.

As I was gathering my supplies to go to Fabric Fest I read on one of my class lists "wooden iron". I immediately had panic...it would take up too much room in  my suitcase, add weight, would allow me to bring less back with me. I was visualizing some big, heavy, takes up lots of space item fashioned out of block of wood. Off to google to see if I could get away with not taking it and "improvise" something possibly from a hotel room. Silly me is all I will say now!!!

A "wooden iron" is a favorite tool of Eleanor Burns. For good reason too! This little teeny takes up next to no space little tool is THE BOMB!

I used it throughout my class with her for the Kylies Kits Quilt. Rather than hopping up to the ironing board set up, rub this nifty tool over your seam and you can move on to the next step. From the manufacturer... Excellent to press seams open or to one side or crease fabric instead of your fingernail or iron. Use for applique, paper piecing and quilting. Carry in your hand sewing kit. Set next to your sewing machine. This little tool is available in both a left and right handed version. I found mine on Amazon and they are in the $5- $6 range.


Now my "regular iron" has been giving me fits for AGES! There has been no steaming for I have no idea how long and the reservoir leaks so I had been keeping an eye open for months to see if I saw something suitable. In forums various names had floated around as "good" including Rowaneta and Shark. Up here my choices are limited so it was on my list to keep an eye out for while in Vegas if I had the opportunity to get some shopping in.

Then I saw her!!! Oh my LOVE at first sight! Let me introduce you to the Oliso TG1600 1800 watts Smart Pro Iron.
This is some poor random lady standing next to me :) We had fun!


Up and down! It has FEET!!

Ben crashing around in the basement proof!


I LOVE LOVE LOVE LOVE this iron. Did I mention I LOVE it?

First the features that "work" for me.
  • 12 foot cord. My iron plugs in under my sewing table bank and this cord length means I can move my board back away from my chair reducing the risk of injury while increasing my overall room to work in.
  • the FEET. Seriously this is the BOMB! As soon as you lift your hand from this iron it raises up on a set of feet and your fabric and board cover are not at risk of scorching. It takes a little bit to get used to not "tipping your iron up" but believe me you do get used to it and it is an amazing feature.
  • Extended Auto Shut Off. With the feature of the feet they have been able to allow for an extended period of heat. No longer do I need to "bump" my iron to turn it on again. It is fully hot like it was 5 minutes ago. It will shut off after a period of 30 minutes of inactivity.
  • Board Stability. this has long been an issue in our home. With my sewing studio in the basement where the kids can also play, w have previously experienced a couple episodes of the iron got knocked over and turned on and melted/scorched...insert: fabric stack, ironing board, carpet. In fact, when I saw this iron my first consideration was that I could sell my hubby on approving the purchase with this one safety feature alone. It has been that much of a concern to him.
  • Steam...it has OODLES and OODLES of nice hot steam and a wonderful glide on the fabric. NO LEAKING.
It is pricey but not insane when compared to a Rowaneta. Retailing for $200 US, one can often find it at a "show price" around $150. Mine also came with an additional year of free warranty through the show and they will honor the warranty even though the iron is now "Canadian" without issue. Believe me, I checked this fact out.

Super happy with my purchase and as much as I absolutely despised ironing before I enjoy it now.


Pin It!

Friday, October 4, 2013

Bring on the Aprons! Fall is here.

Here it has been a couple of weeks since my last post. I REALLY need to figure out where the time sneaks off to!

Today it is dreary and rainy out. At just a few degrees above freezing it is a timely reminder that our long winter is just around the corner! It is time to break out the crock pot, turn on the fireplace and settle in for a winter of sewing and knitting.

The kids are now into a routine with school and the mornings are getting easier. All these long years I had awaited to have my "free time" and had hoped it would be like fireworks and heavy weight lifted from my shoulders. That is not how it has turned out though. Those first two day I was busily getting ready to leave for Vegas (I owe you all so very many posts about Vegas), then when I got back I combined some sort of desert bug, airliner bug and kindergarten boogers to make a new world plague that sapped me to bed for three days.  The next week the school decided to have it's first round of the 3 day stomach bug and so it went through our house ever so eagerly for the next 9 days. Suddenly it is OCTOBER!! HOW did that HAPPEN?!?

Nechako Notionary is now "officially" open. Not with the fanfare I had hope for nor the inventory but life has been happening and so will the inventory (eventually). IT will come and I have some great plans for stock for the Christmas buying season.

Next week I am doing a little bit of a "giving back" project. I have always been active (very) in my kids' school. While I am taking this year off of having "official roles" so that I can sort my adult life out now that there are no preschoolers home, I am still available to be involved in areas as needed.

A week ago I was asked if I had fabric I would donate to a program at the school that I was instrumental in starting. They wanted to make aprons for a couple of the students that worked in the Farm to School program as part of their life skills. I asked who/how they aprons were going to be made and the person said they would "try to put something together". I got an idea and told her to let me work on something and get back to her. I approached the principal and she was immediately on board. Soooo... next week I am going to spend a couple hours a day at the school with a small group of life skills students and we (THEY) are going to sew themselves some aprons. I am pretty excited to do this and allow the kids to explore something that would not normally be available to them skills-wise as well as see the pride that they will have in their finished product.

While looking at various patterns out there for aprons, I came across this blog post from Apronista which is pointing to Tip Junkie  featuring 24 FREE apron patterns. I hope to find just what the students will need and perhaps one for me too for baking now that the weather has turned. Perhaps you will find something cute and functional for you too?
Pin It!

Thursday, September 19, 2013

Generosity


Generosity
 (also called largess or largesse) is the habit of giving without expecting anything in return. It can involve offering time, assets or talents to aid someone in need. Often equated with charity as a virtue, generosity is widely accepted in society as a desirable trait. ~ Wikipedia

I try to participate in various "giving acts" as they come up. The most recent was taking pillowcases to Riley Blake Fabric Fest for Conker Cancer. It feels good to give when I can, and is often not an imposition on me in the least.

But what of the recipients? How do they feel?

I was recently made privy to that immense experience. You see, I do have medical issues that are chronic. Sometimes very debilitating, but other times one would not know I was ill to look at me. I am very fortunate to have a team that looks after my needs, is willing to explore options and does their best to make my daily life the best it can be. I have ongoing treatments in our hospital's oncology unit to keep me "well".

There are fabulous groups in our community (like so many others as well) who support the Oncology unit. Recently I was gifted a comfort item to use during my stays. It was a fabulously beautiful quilt made by The Gospel Chapel E.F.C. Ladies using the Sweet Nothings line from Riley Blake.


A number of things stuck me... 1. the sheer number of quilts that came in that donation. I have been around the unit since its' inception and this was a massive donation. 2. The number of "manly" quilts. It is so lovely to see that the men are looked after in this donation. I have seen some pretty burley men in some rather dainty quilts from time to time. 3. The overall diversity of the quilts...for ladies, men, younger folk and even children. 4. The quality of both the workmanship and the fabrics. Every one of these quilts that I have seen has literally been a work of art.

As I was gifted mine, I was nearly brought to tears but at the same time had a huge smile on my face. It was a design that was bright and cheery with a fabric line that I love. I even have a couple of bolts from this line in my own fabric stash! It was a quilt that was "ME". That was a few months ago.

Today, I was again reminded of the generosity of this fabulous group as my quilt was brought out of the "quilt oven" and placed on me, tucking in my shivering, sick, aching body. It was a slice of heaven, of comfort and love.

To all of you who have participated in an act of generosity... THANK YOU...from the bottom of my heart, thank you. Your acts of kindness do not go unnoticed. They are appreciated. The love you put into your items is felt. I may have never met the donor of my quilt (or perhaps I have and it is someone I do know that is part of that group) but I do feel their love every time I have my quilt. 


Pin It!